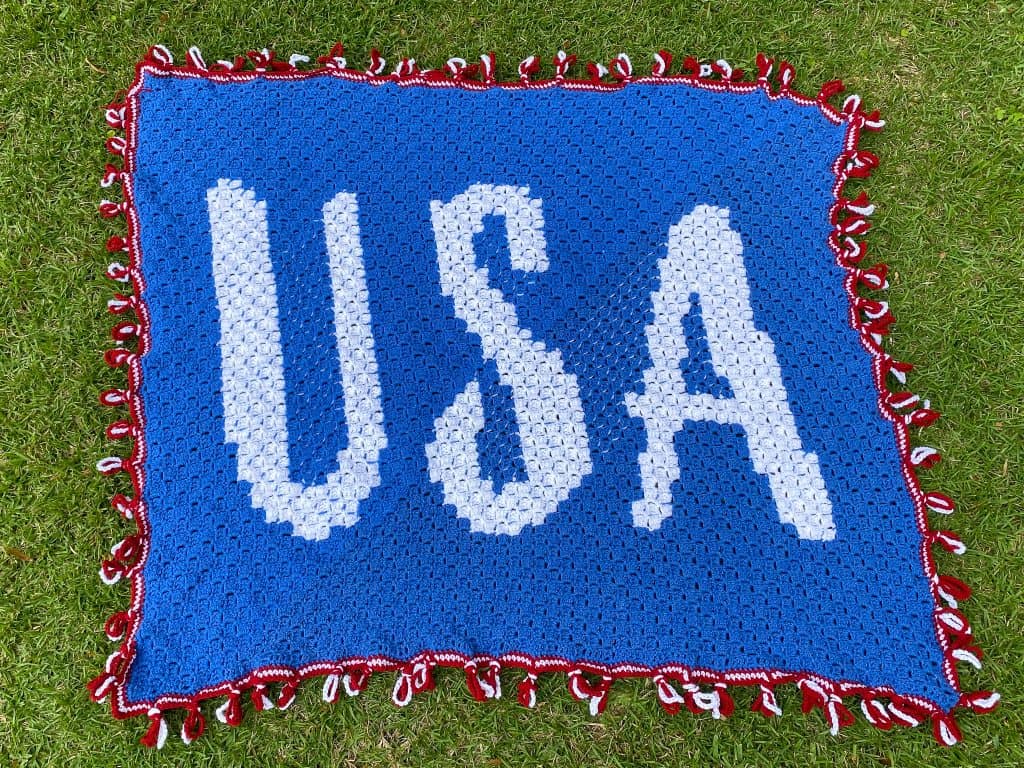
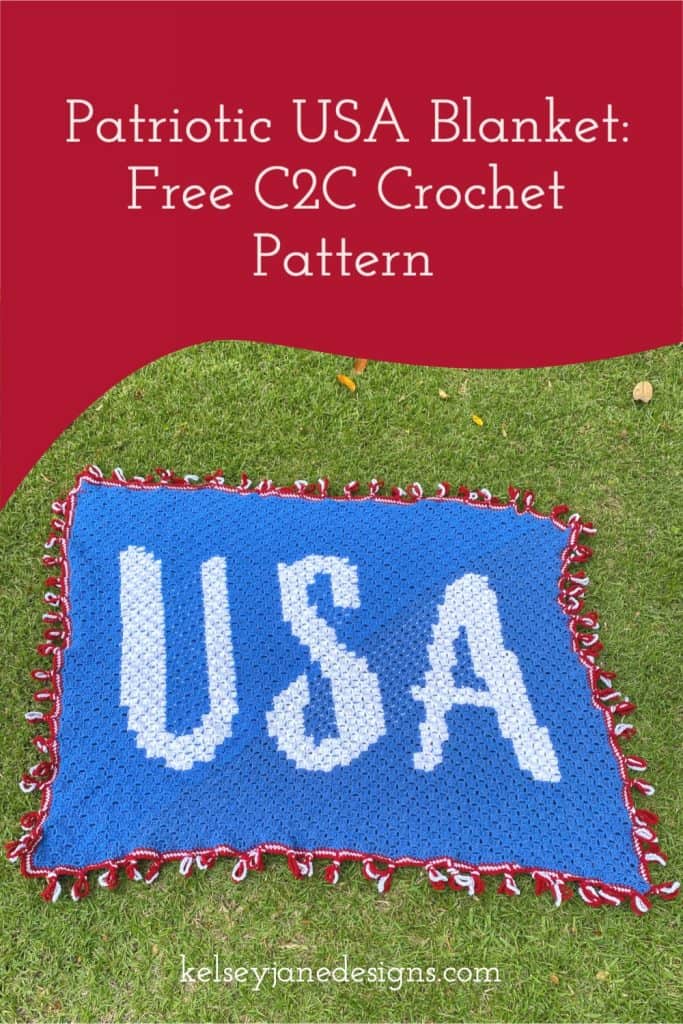
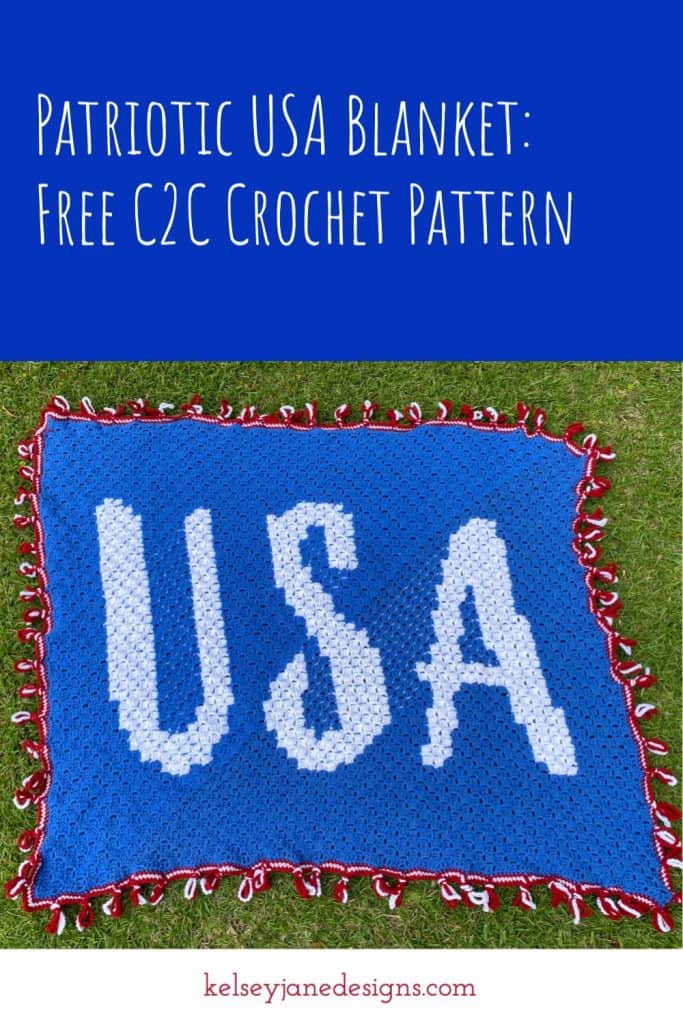
USA Patriotic C2C Lapghan Free Crochet Pattern
The following post contains affiliate links. By clicking on the links you are supporting my site and allowing me to continue to create free content. I promise, I only share products that I use and love! For more information please see my disclosure page.
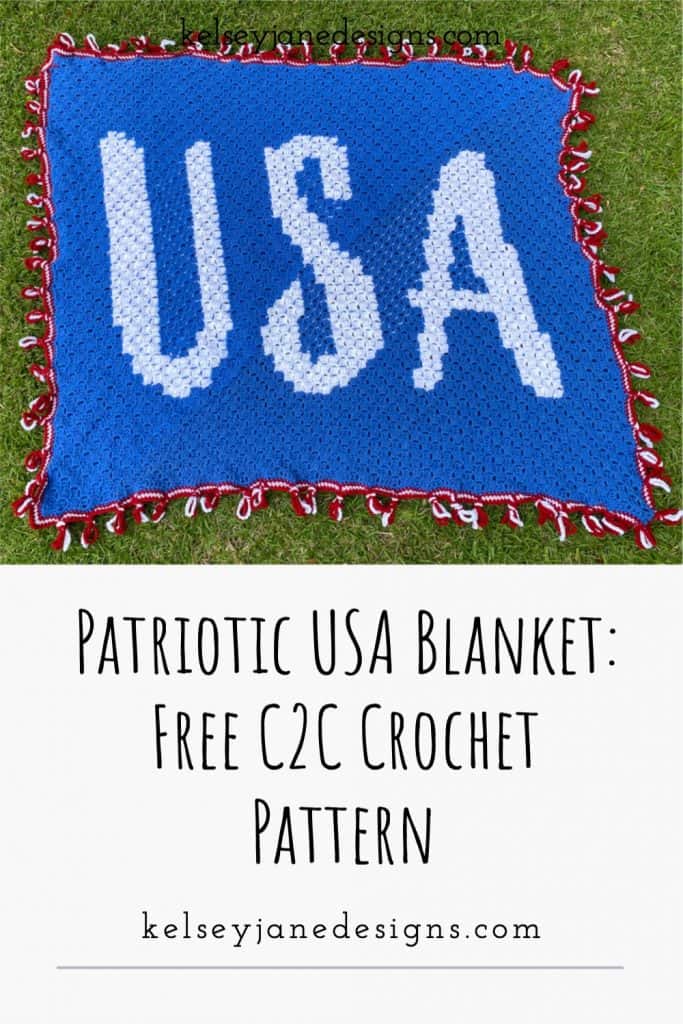
With 4th of July and the Summer Olympics right around the corner, you can crochet this patriotic free and easy C2C lapghan sized blanket for your home! Using Lion Brand Pound of Love this blanket is affordable to make and works up really quickly! Any eager beginner can easily take on this project.
The following post contains affiliate links. By clicking on the links you are supporting my site and allowing me to continue to create free content. I promise, I only share products that I use and love! For more information please see my disclosure page.
I really love decorating our home for every season and holiday. I don’t usually go over board (except Christmas of course) but just a few touches here and there really goes a long way in my opinion. And a throw blanket is the perfect way to dress up my couch for each holiday! Having a stock pile of Lion Brand Pound of Yarn from making hats on my Addi Knitting Machine, I got started on this stash busting design!
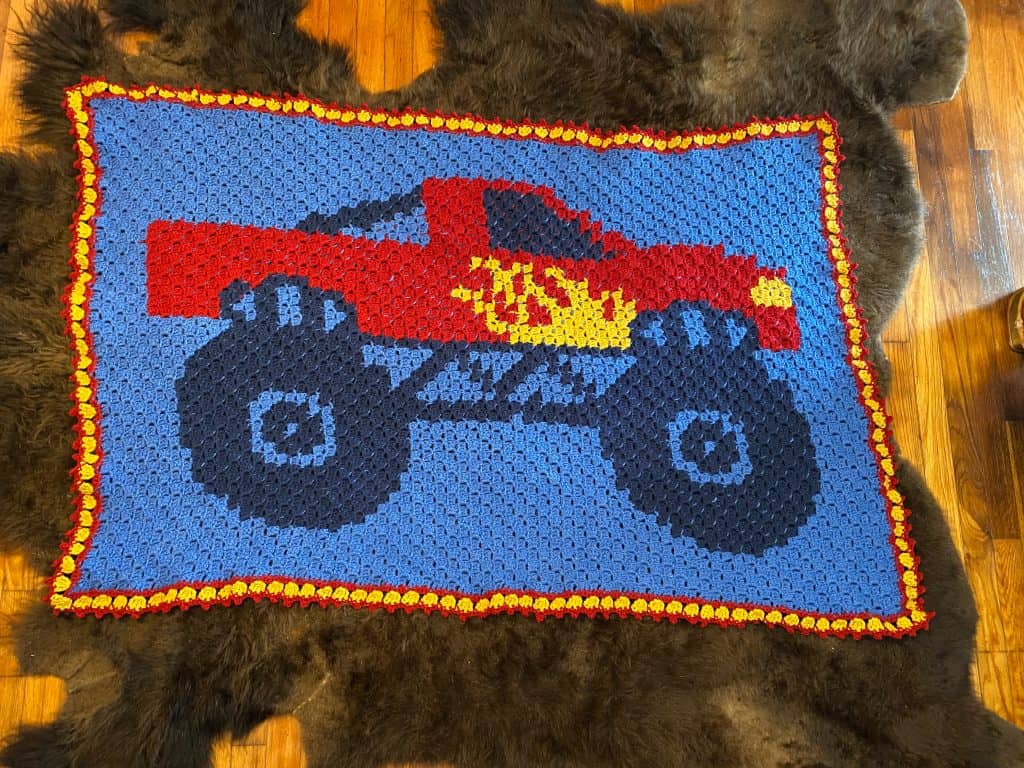
I really love using Pound of Love yarn for home decor projects. It’s easy to machine wash, super affordable and provides a lightweight drape that is perfect for a summer time blanket! And of course what’s not to love about a corner to corner blanket pattern… they are highly addicting and so much fun to watch the design take shape with each additional row. If you like FREE C2C patterns be sure to check out my Monster Truck Blanket. The perfect size for your truck loving toddler’s bed!
If you would like to use another yarn, I highly recommend for all my patterns to check out Yarn Sub. They virtually have every yarn known to man and offer valuable tips on how to properly substitute. I can’t count how many times I personally have made poor decisions when substituting a yarn only for the pattern not to turn out right. I am in no way affiliated with this site, I just love it and want to spread the word to other yarn lovers!
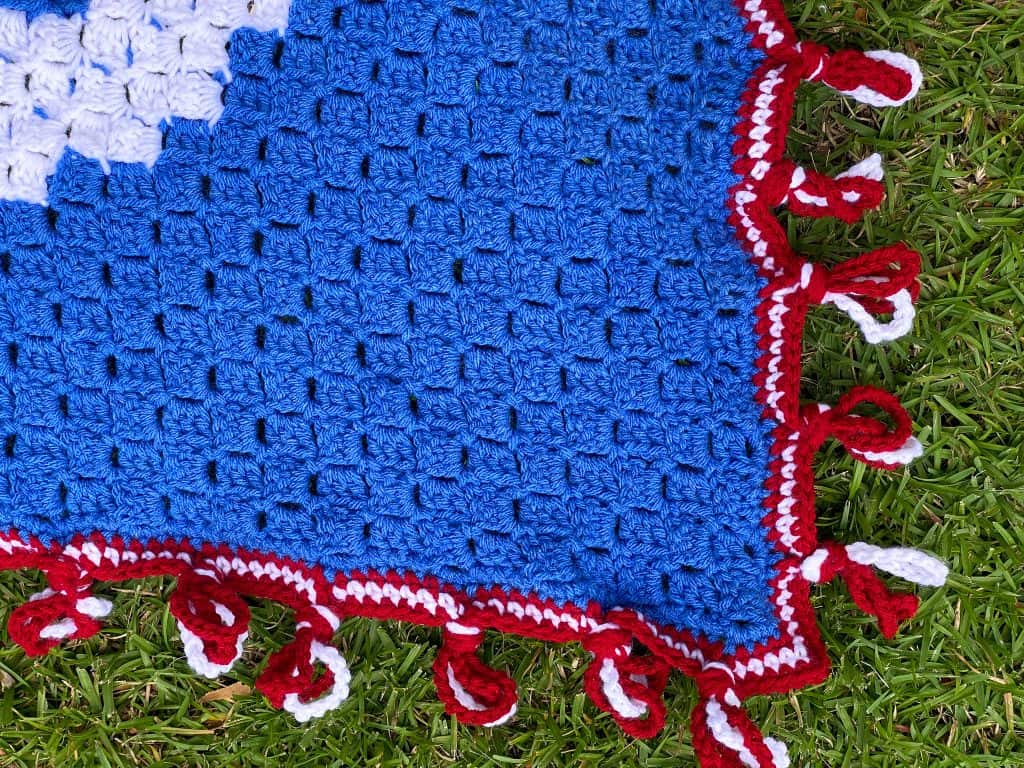
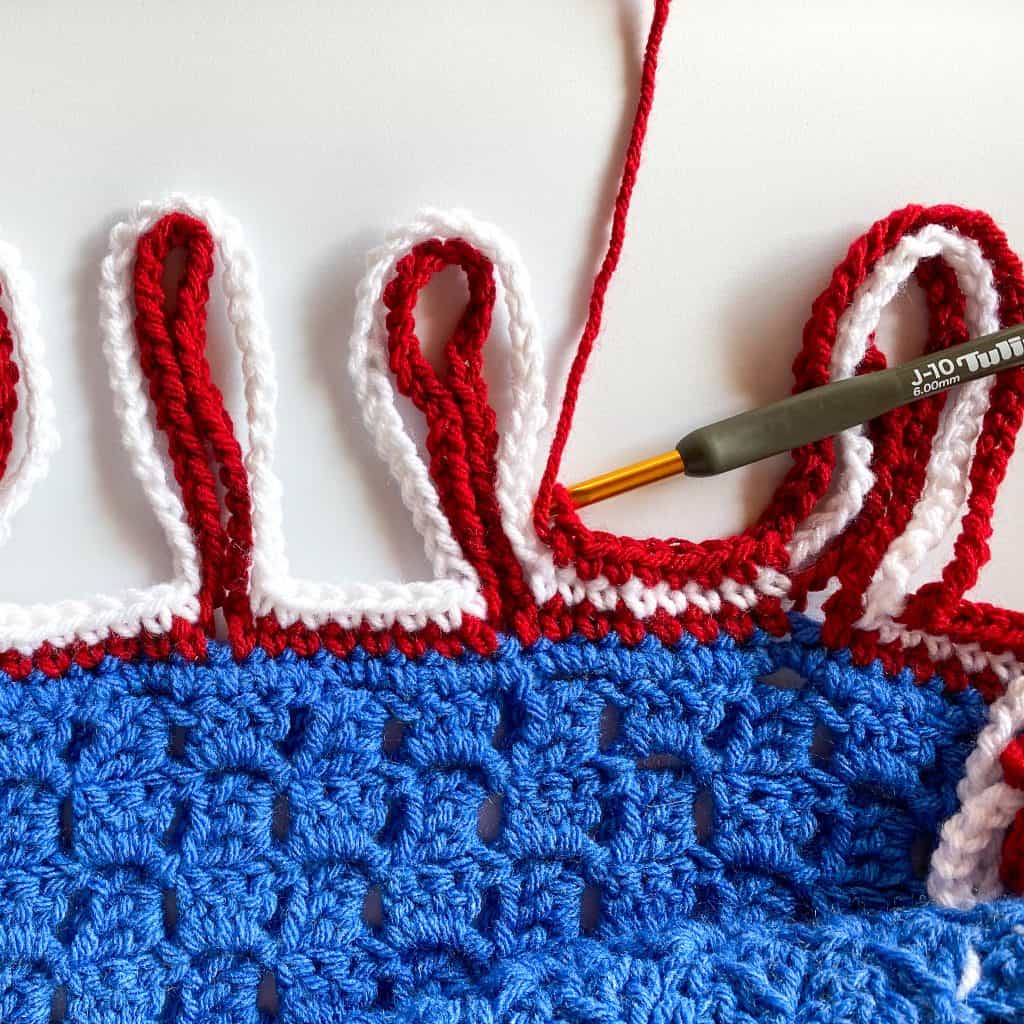
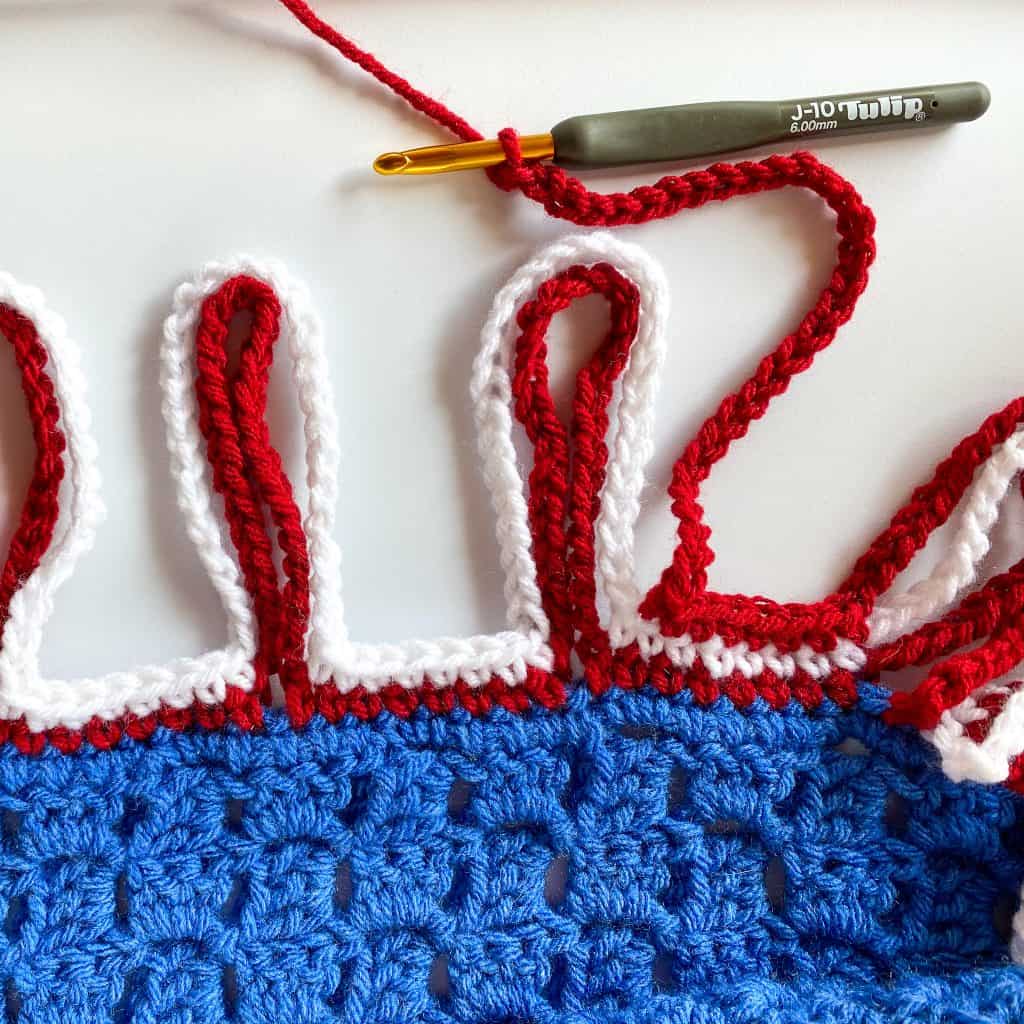
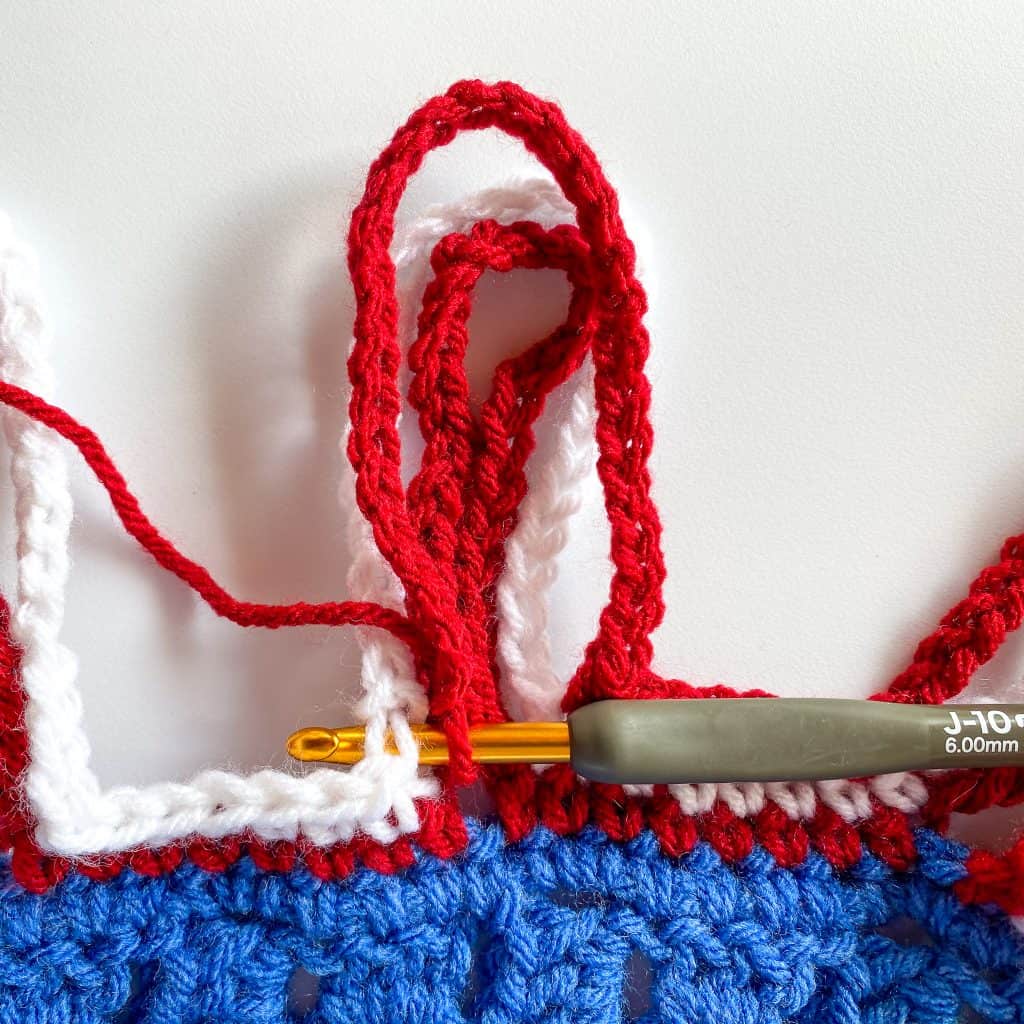
For the border of this blanket, I wanted to continue with the summer/patriotic theme so I decided to go with this “Nautical Knot” border. The construction is basically three rows of chained loops that are tied together in the end with an overhand knot. To help with tying the knot I made a quick video showing how to tie it. I also included in the border instructions a few photos showing how to construct the border.
Pin this pattern for later!
- Get the ad-free, low cost, printable PDF pattern HERE.
- PIN this pattern to your Pinterest boards for later.
- Save to your Ravelry queue HERE.
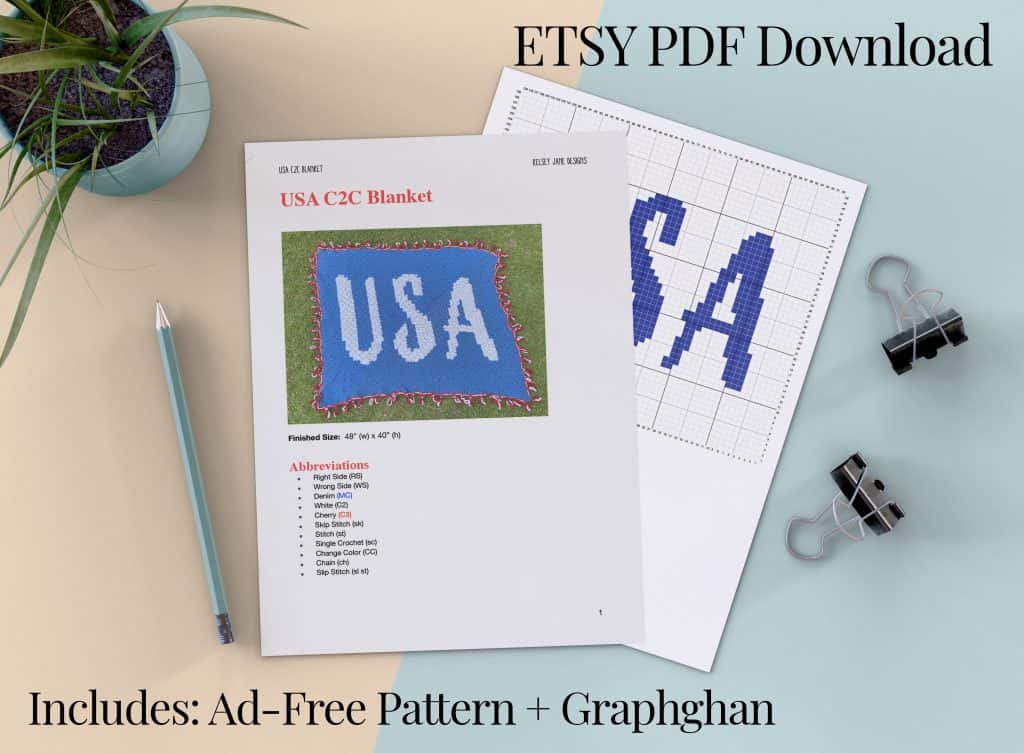
If you would like to see the ad-free printable version of the pattern, check out my ETSY shop! Bonus benefits of the PDF pattern purchase include:
- Ad-Free Instructions
- Color Coded Copy of Instructions for easier reading
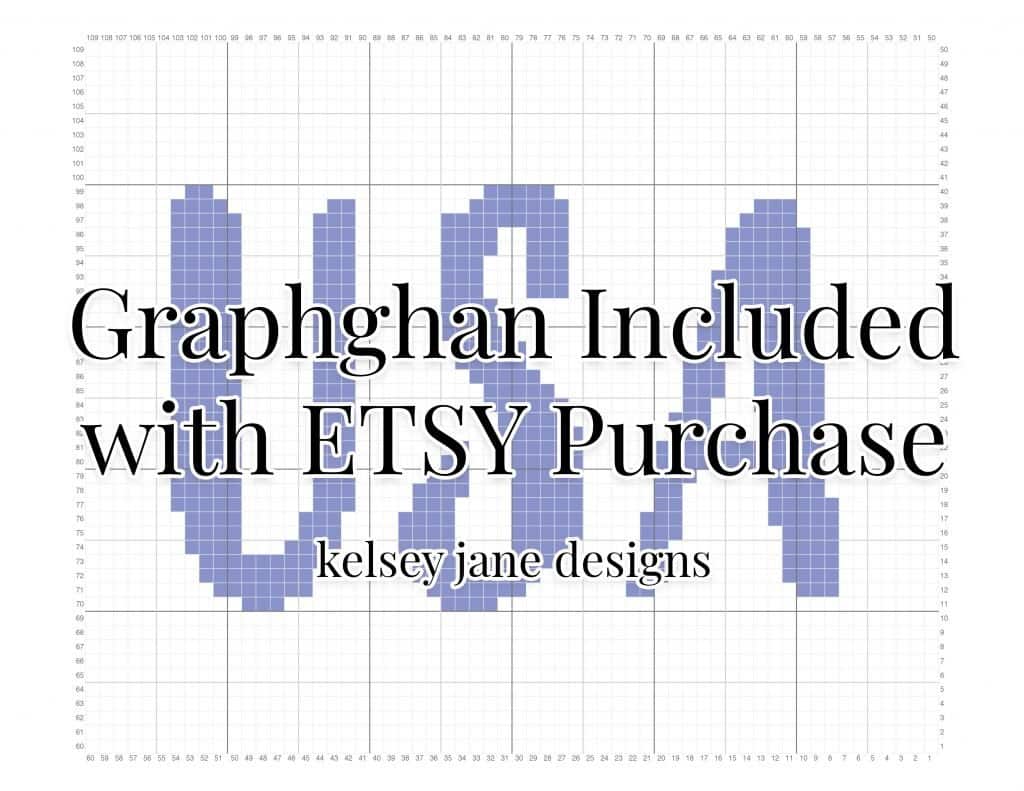
- Graphghan Chart of the pattern
The Pattern:
Finished Size: 48” (w) x 40” (h)
Abbreviations
- Right Side (RS)
- Wrong Side (WS)
- Denim (MC)
- White (C2)
- Cherry (C3)
- Stitch (st)
- Single Crochet (sc)
- Change Color (CC)
- Chain (ch)
- Slip Stitch (sl st)
Supplies
- Lion Brand Pound of Love:
- Denim: 1,600 yards (MC)
- White: 520 yards (C2)
- Cherry: 320 yards (C3)
- Denim: 1,600 yards (MC)
- 6mm hook (J)
- Scissors (these are perfect for traveling!)
- Yarn Needle
Notes
- This lapghan sized blanket is the perfect size for your couch!
- C2C Basics:
- Each square is made up of 3 double crochets.
- For basic construction, I highly recommend this YouTube video: https://youtu.be/4wPWAbsd3fk
- Each square is made up of 3 double crochets.
- Pattern is a rectangle C2C project.
- You will increase once per row until Row 50 when you reach the top right corner of the blanket.
- Rows 50-60 you’ll maintain 50 squares by increasing the bottom width and maintaining the height.
- Rows 61-109 you’ll be decreasing on both ends making the rectangle close.
- For more help: https://youtu.be/J6MV_-qjDtc
- For changing colors, before finishing the last stitch of old color, put a loop of new color on hook and pull through. https://youtu.be/SbG78BvZw8E
- Another option for changing colors is to carry your yarn underneath the square you are working. A lot of people hate this method because you can see the yarn slightly but I personally hate weaving in ends even more. So if you’d like to learn more about carrying your yarn then check out this YouTube video: https://youtu.be/Mb4sqLTkKtQ
Instructions:
All squares are worked as a standard C2C with 3 Double Crochets.
↙ Row 1 [RS]: (MC) x 1 (1 square)
↗ Row 2 [WS]: (MC) x 2 (2 squares)
↙ Row 3 [RS]: (MC) x 3 (3 squares)
↗ Row 4 [WS]: (MC) x 4 (4 squares)
↙ Row 5 [RS]: (MC) x 5 (5 squares)
↗ Row 6 [WS]: (MC) x 6 (6 squares)
↙ Row 7 [RS]: (MC) x 7 (7 squares)
↗ Row 8 [WS]: (MC) x 8 (8 squares)
↙ Row 9 [RS]: (MC) x 9 (9 squares)
↗ Row 10 [WS]: (MC) x 10 (10 squares)
↙ Row 11 [RS]: (MC) x 11 (11 squares)
↗ Row 12 [WS]: (MC) x 12 (12 squares)
↙ Row 13 [RS]: (MC) x 13 (13 squares)
↗ Row 14 [WS]: (MC) x 14 (14 squares)
↙ Row 15 [RS]: (MC) x 15 (15 squares)
↗ Row 16 [WS]: (MC) x 16 (16 squares)
↙ Row 17 [RS]: (MC) x 17 (17 squares)
↗ Row 18 [WS]: (MC) x 18 (18 squares)
↙ Row 19 [RS]: (MC) x 7, (C2) x 1, (MC) x 11 (19 squares)
↗ Row 20 [WS]: (MC) x 11, (C2) x 2, (MC) x 7 (20 squares)
↙ Row 21 [RS]: (MC) x 7, (C2) x 3, (MC) x 11 (21 squares)
↗ Row 22 [WS]: (MC) x 12, (C2) x 3, (MC) x 7 (22 squares)
↙ Row 23 [RS]: (MC) x 7, (C2) x 4, (MC) x 12 (23 squares)
↗ Row 24 [WS]: (MC) x 13, (C2) x 4, (MC) x 7 (24 squares)
↙ Row 25 [RS]: (MC) x 7, (C2) x 4, (MC) x 14 (25 squares)
↗ Row 26 [WS]: (MC) x 15, (C2) x 3, (MC) x 8 (26 squares)
↙ Row 27 [RS]: (MC) x 8, (C2) x 3, (MC) x 16 (27 squares)
↗ Row 28 [WS]: (MC) x 16, (C2) x 4, (MC) x 8 (28 squares)
↙ Row 29 [RS]: (MC) x 8, (C2) x 4, (MC) x 17 (29 squares)
↗ Row 30 [WS]: (MC) x 18, (C2) x 4, (MC) x 8 (30 squares)
↙ Row 31 [RS]: (MC) x 8, (C2) x 4, (MC) x 19 (31 squares)
↗ Row 32 [WS]: (MC) x 11, (C2) x 2, (MC) x 7, (C2) x 4, (MC) x 8 (32 squares)
↙ Row 33 [RS]: (MC) x 8, (C2) x 5, (MC) x 6, (C2) x 3, (MC) x 11 (33 squares)
↗ Row 34 [WS]: (MC) x 12, (C2) x 4, (MC) x 4, (C2) x 6, (MC) x 8 (34 squares)
↙ Row 35 [RS]: (MC) x 8, (C2) x 4, (MC) x 1, (C2) x 2, (MC) x 3, (C2) x 3, (MC) x 14 (35 squares)
↗ Row 36 [WS]: (MC) x 15, (C2) x 3, (MC) x 2, (C2) x 2, (MC) x 2, (C2) x 4, (MC) x 8 (36 squares)
↙ Row 37 [RS]: (MC) x 9, (C2) x 4, (MC) x 2, (C2) x 6, (MC) x 16 (37 squares)
↗ Row 38 [WS]: (MC) x 18, (C2) x 4, (MC) x 3, (C2) x 4, (MC) x 9 (38 squares)
↙ Row 39 [RS]: (MC) x 9, (C2) x 4, (MC) x 3, (C2) x 4, (MC) x 19 (39 squares)
↗ Row 40 [WS]: (MC) x 20, (C2) x 4, (MC) x 3, (C2) x 4, (MC) x 9 (40 squares)
↙ Row 41 [RS]: (MC) x 9, (C2) x 4, (MC) x 2, (C2) x 6, (MC) x 4, (C2) x 5, (MC) x 11 (41 squares)
↗ Row 42 [WS]: (MC) x 10, (C2) x 7, (MC) x 4, (C2) x 1, (MC) x 1, (C2) x 4, (MC) x 2, (C2) x 4, (MC) x 9 (42 squares)
↙ Row 43 [RS]: (MC) x 9, (C2) x 4, (MC) x 2, (C2) x 3, (MC) x 7, (C2) x 8, (MC) x 10 (43 squares)
↗ Row 44 [WS]: (MC) x 10, (C2) x 9, (MC) x 7, (C2) x 4, (MC) x 1, (C2) x 4, (MC) x 9 (44 squares)
↙ Row 45 [RS]: (MC) x 9, (C2) x 9, (MC) x 7, (C2) x 5, (MC) x 1, (C2) x 4, (MC) x 10 (45 squares)
↗ Row 46 [WS]: (MC) x 11, (C2) x 2, (MC) x 3, (C2) x 5, (MC) x 8, (C2) x 8, (MC) x 9 (46 squares)
↙ Row 47 [RS]: (MC) x 10, (C2) x 7, (MC) x 8, (C2) x 5, (MC) x 3, (C2) x 3, (MC) x 11 (47 squares)
↗ Row 48 [WS]: (MC) x 12, (C2) x 2, (MC) x 4, (C2) x 5, (MC) x 9, (C2) x 6, (MC) x 10 (48 squares)
↙ Row 49 [RS]: (MC) x 10, (C2) x 6, (MC) x 10, (C2) x 4, (MC) x 4, (C2) x 3, (MC) x 12 (49 squares)
↗ Row 50 [WS]: (MC) x 13, (C2) x 3, (MC) x 4, (C2) x 4, (MC) x 11, (C2) x 4, (MC) x 11 (50 squares)
Top Right Corner: you will no longer be increasing in the top right corner. For now on when you complete a row in this corner, slip stitch into first square of previous row and turn, this will stop increasing. to start the next row slip stitch into 3 double crochets of last square then ch 3 and start new square.
↙ Row 51 [RS]: (MC) x 11, (C2) x 3, (MC) x 11, (C2) x 4, (MC) x 4, (C2) x 3, (MC) x 14 (50 squares)
↗ Row 52 [WS]: (MC) x 14, (C2) x 5, (MC) x 3, (C2) x 3, (MC) x 25 (50 squares)
↙ Row 53 [RS]: (MC) x 24, (C2) x 4, (MC) x 2, (C2) x 5, (MC) x 15 (50 squares)
↗ Row 54 [WS]: (MC) x 16, (C2) x 5, (MC) x 2, (C2) x 3, (MC) x 24 (50 squares)
↙ Row 55 [RS]: (MC) x 23, (C2) x 3, (MC) x 2, (C2) x 4, (MC) x 18 (50 squares)
↗ Row 56 [WS]: (MC) x 11, (C2) x 1, (MC) x 12, (C2) x 3, (MC) x 23 (50 squares)
↙ Row 57 [RS]: (MC) x 22, (C2) x 3, (MC) x 10, (C2) x 5, (MC) x 10 (50 squares)
↗ Row 58 [WS]: (MC) x 10, (C2) x 6, (MC) x 10, (C2) x 3, (MC) x 21 (50 squares)
↙ Row 59 [RS]: (MC) x 17, (C2) x 1, (MC) x 3, (C2) x 3, (MC) x 8, (C2) x 8, (MC) x 10 (50 squares)
↗ Row 60 [WS]: (MC) x 11, (C2) x 8, (MC) x 8, (C2) x 3, (MC) x 2, (C2) x 2, (MC) x 16 (50 squares)
Bottom Left Corner: Width increasing ends, you will begin decreasing on both ends with Row 61.
↙ Row 61 [RS]: (MC) x 15, (C2) x 3, (MC) x 2, (C2) x 3, (MC) x 7, (C2) x 4, (MC) x 2, (C2) x 3, (MC) x 10 (49 squares)
↗ Row 62 [WS]: (MC) x 9, (C2) x 3, (MC) x 4, (C2) x 3, (MC) x 7, (C2) x 3, (MC) x 2, (C2) x 3, (MC) x 14 (48 squares)
↙ Row 63 [RS]: (MC) x 13, (C2) x 3, (MC) x 2, (C2) x 3, (MC) x 7, (C2) x 3, (MC) x 5, (C2) x 2, (MC) x 9 (47 squares)
↗ Row 64 [WS]: (MC) x 8, (C2) x 3, (MC) x 5, (C2) x 3, (MC) x 6, (C2) x 3, (MC) x 3, (C2) x 3, (MC) x 12 (46 squares)
↙ Row 65 [RS]: (MC) x 11, (C2) x 3, (MC) x 3, (C2) x 3, (MC) x 6, (C2) x 3, (MC) x 5, (C2) x 3, (MC) x 8 (45 squares)
↗ Row 66 [WS]: (MC) x 8, (C2) x 3, (MC) x 5, (C2) x 3, (MC) x 6, (C2) x 3, (MC) x 3, (C2) x 2, (MC) x 11 (44 squares)
↙ Row 67 [RS]: (MC) x 10, (C2) x 3, (MC) x 1, (C2) x 4, (MC) x 6, (C2) x 3, (MC) x 5, (C2) x 4, (MC) x 7 (43 squares)
↗ Row 68 [WS]: (MC) x 7, (C2) x 4, (MC) x 5, (C2) x 3, (MC) x 6, (C2) x 7, (MC) x 10 (42 squares)
↙ Row 69 [RS]: (MC) x 10, (C2) x 6, (MC) x 6, (C2) x 3, (MC) x 5, (C2) x 4, (MC) x 7 (41 squares)
↗ Row 70 [WS]: (MC) x 7, (C2) x 4, (MC) x 5, (C2) x 3, (MC) x 6, (C2) x 5, (MC) x 10 (40 squares)
↙ Row 71 [RS]: (MC) x 10, (C2) x 4, (MC) x 6, (C2) x 3, (MC) x 5, (C2) x 5, (MC) x 6 (39 squares)
↗ Row 72 [WS]: (MC) x 6, (C2) x 5, (MC) x 5, (C2) x 3, (MC) x 6, (C2) x 1, (MC) x 12 (38 squares)
↙ Row 73 [RS]: (MC) x 18, (C2) x 3, (MC) x 5, (C2) x 5, (MC) x 6 (37 squares)
↗ Row 74 [WS]: (MC) x 6, (C2) x 5, (MC) x 5, (C2) x 3, (MC) x 17 (36 squares)
↙ Row 75 [RS]: (MC) x 16, (C2) x 3, (MC) x 5, (C2) x 5, (MC) x 6 (35 squares)
↗ Row 76 [WS]: (MC) x 6, (C2) x 5, (MC) x 5, (C2) x 3, (MC) x 15 (34 squares)
↙ Row 77 [RS]: (MC) x 14, (C2) x 3, (MC) x 5, (C2) x 5, (MC) x 6 (33 squares)
↗ Row 78 [WS]: (MC) x 6, (C2) x 5, (MC) x 5, (C2) x 3, (MC) x 13 (32 squares)
↙ Row 79 [RS]: (MC) x 12, (C2) x 3, (MC) x 5, (C2) x 5, (MC) x 6 (31 squares)
↗ Row 80 [WS]: (MC) x 6, (C2) x 5, (MC) x 5, (C2) x 3, (MC) x 11 (30 squares)
↙ Row 81 [RS]: (MC) x 11, (C2) x 2, (MC) x 5, (C2) x 5, (MC) x 6 (29 squares)
↗ Row 82 [WS]: (MC) x 6, (C2) x 5, (MC) x 17 (28 squares)
↙ Row 83 [RS]: (MC) x 16, (C2) x 5, (MC) x 6 (27 squares)
↗ Row 84 [WS]: (MC) x 6, (C2) x 5, (MC) x 15 (26 squares)
↙ Row 85 [RS]: (MC) x 14, (C2) x 5, (MC) x 6 (25 squares)
↗ Row 86 [WS]: (MC) x 6, (C2) x 5, (MC) x 13 (24 squares)
↙ Row 87 [RS]: (MC) x 12, (C2) x 5, (MC) x 6 (23 squares)
↗ Row 88 [WS]: (MC) x 6, (C2) x 4, (MC) x 12 (22 squares)
↙ Row 89 [RS]: (MC) x 11, (C2) x 4, (MC) x 6 (21 squares)
↗ Row 90 [WS]: (MC) x 6, (C2) x 3, (MC) x 11 (20 squares)
↙ Row 91 [RS]: (MC) x 10, (C2) x 3, (MC) x 6 (19 squares)
↗ Row 92 [WS]: (MC) x 6, (C2) x 2, (MC) x 10 (18 squares)
↙ Row 93 [RS]: (MC) x 17 (17 squares)
↗ Row 94 [WS]: (MC) x 16 (16 squares)
↙ Row 95 [RS]: (MC) x 15 (15 squares)
↗ Row 96 [WS]: (MC) x 14 (14 squares)
↙ Row 97 [RS]: (MC) x 13 (13 squares)
↗ Row 98 [WS]: (MC) x 12 (12 squares)
↙ Row 99 [RS]: (MC) x 11 (11 squares)
↗ Row 100 [WS]: (MC) x 10 (10 squares)
↙ Row 101 [RS]: (MC) x 9 (9 squares)
↗ Row 102 [WS]: (MC) x 8 (8 squares)
↙ Row 103 [RS]: (MC) x 7 (7 squares)
↗ Row 104 [WS]: (MC) x 6 (6 squares)
↙ Row 105 [RS]: (MC) x 5 (5 squares)
↗ Row 106 [WS]: (MC) x 4 (4 squares)
↙ Row 107 [RS]: (MC) x 3 (3 squares)
↗ Row 108 [WS]: (MC) x 2 (2 squares)
↙ Row 109 [RS]: (MC) x 1 (1 square)
Don’t cut yarn after complete, your first border row will be using your Main Color yarn.
Total: (MC) x 2383, (C2) x 617
Border:
For Row 2, I mention to continue repeat until 3-6 stitches from the corner. It will be a different number of stitches left for each side. I’ll leave it up to you how many you leave, just keep in mind you will be doing 3 sc in the corder stitch for each row of the border so by the time you finish row 4, there will be a greater distance to the corner from your final loop than there is on row 2.
For Rows 3 and 4 you are basically working a loop over the previous loop and a sc in each sc of the previous row. Below are some photos to give a visual example of working rows 3 and 4.
You will be changing colors for each row:
- Row 1: Blue (C1)
- Row 2: Cherry (C3)
- Row 3: White (C2)
- Row 4: Cherry (C3)

SC up until loop. -
Chain designated number by row. -
SC in 1st SC after the loop. -
Continue to SC up until next loop set.
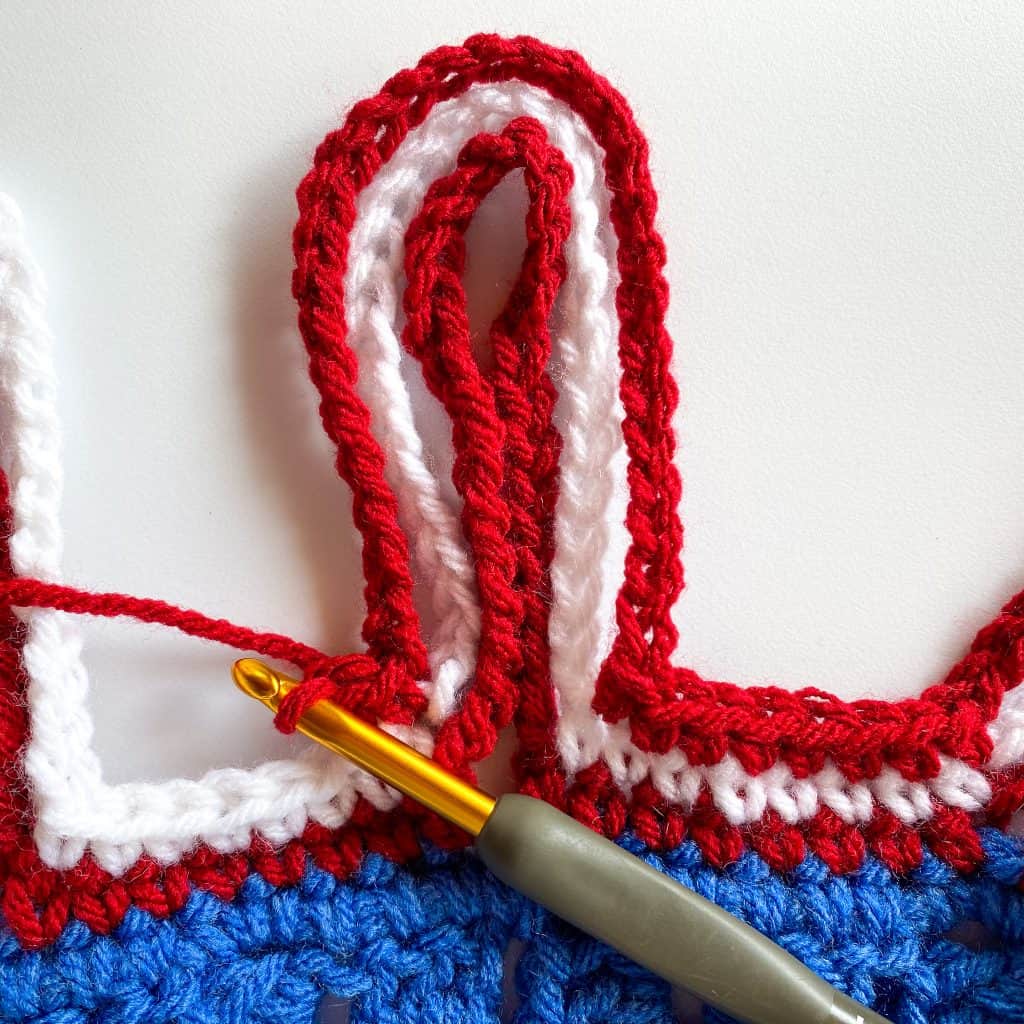
Row 1: Ch 1, sc around the border (starting away from the corner) with 3 sc per square and 3 additional sc in each corner. Once you reach your ch 1, sl st into it and CC to C3.
Row 2: Ch 1, sc in 1st st, ch 30 then sc in next st, *sc in next 7 st, ch 30, sc in next st* repeat until 3-6 stitches away from corner then 3 sc in corner st. Repeat around and sl st into ch 1 and CC to C2.
Row 3: Ch 1, sc in 1st sc, *ch 28 (sk ch 30 loop), sc in next 8 sc* repeat until corner, 3 sc in corner. Repeat around and sl st into ch 1 and CC to C3.
Row 4: Ch 1, sc in 1st sc, *ch 30, (sk ch 28 loop), sc in next 8 sc* repeat until corner, 3 sc in corner. Repeat around and sl st into ch 1 and cut yarn and weave in all ends.
After you are done with Row 4, you will tie each section of 3 loops together in an overhand knot. I have made a quick YouTube video of tying the knot for those visual learners, otherwise follow these steps:
- Grab all 3 loops
- Wrap around your finger
- Pull all 3 loops through the center(where your finger is).
- Count to make sure you have all three then pull tightly.
Congratulations, you are done!
I would love to see your finished work and the colors you used!
Instagram: @kelseyjanedesigns
Ravelry: Kelsey Jane Designs
Be sure to check out my other FREE Crochet Patterns:

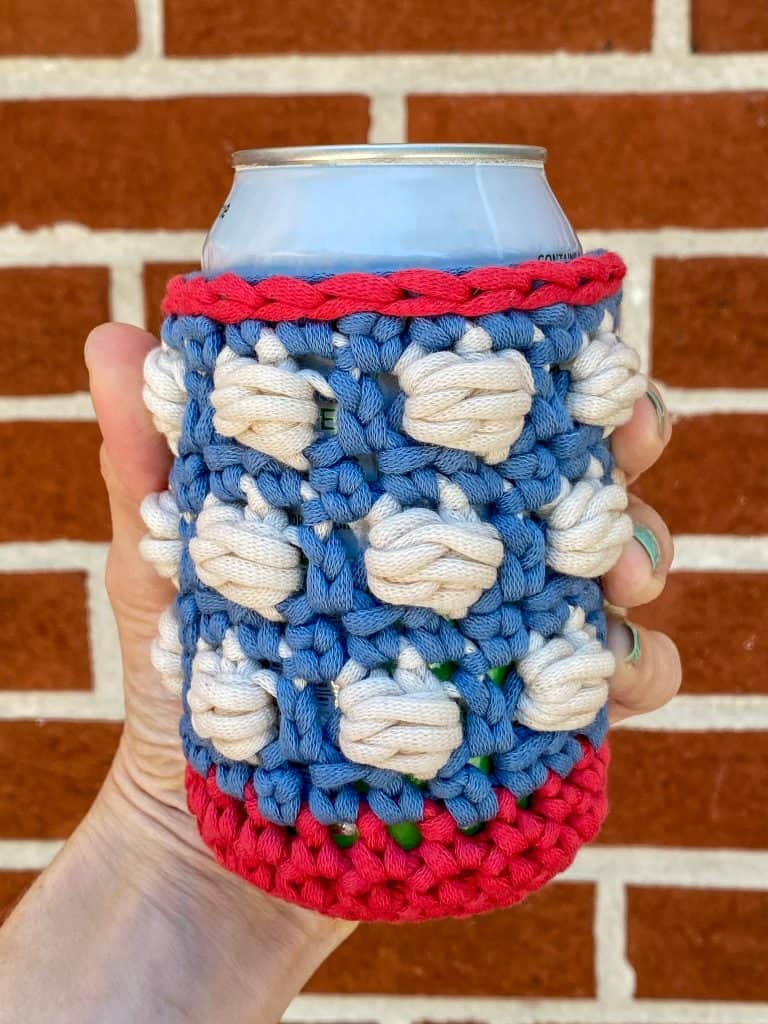
Perfect for the 4th of July or cheering on Team USA at the Summer Olympics. Crochet this perfect for summer boxed bead drink koozie. Available in 5 different sizes, make one for all your favorite beverages. Using Bernat Home Dec Yarn. 
You can make this easy C2C crochet Monster Truck Blanket! Perfect size for a crib, toddler or twin sized bed. Using Lion Brand Pound of Love yarn. -
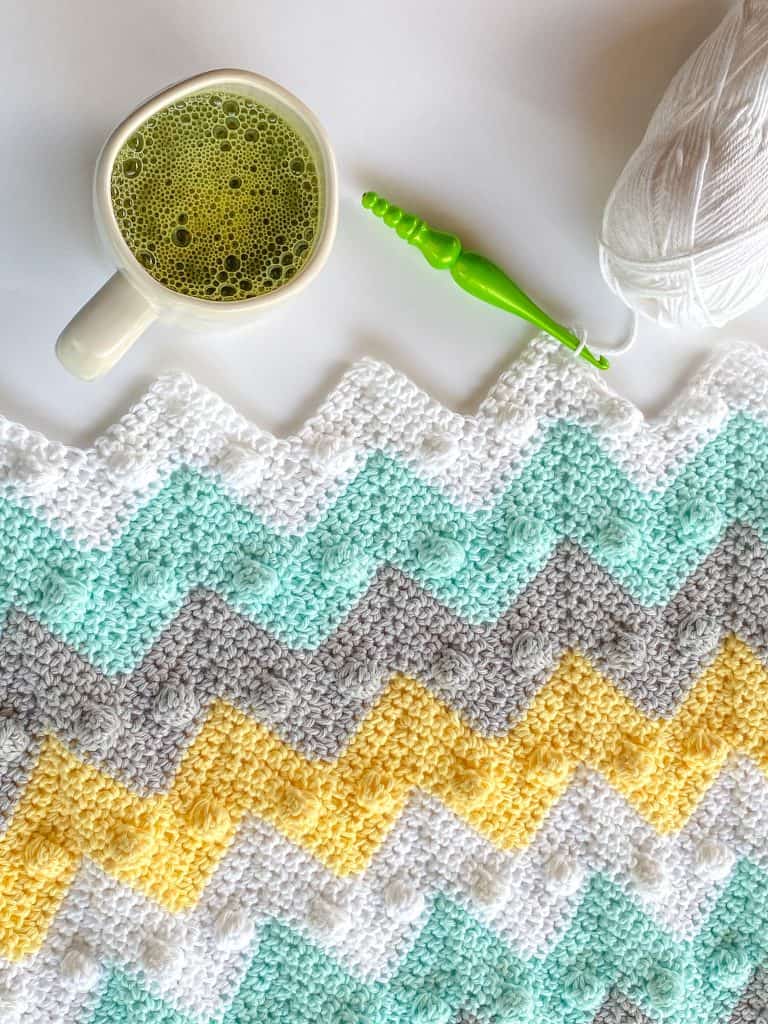
Beginner-friendly bobble chevron baby blanket crochet pattern makes the perfect baby shower gift! With my easy-to-follow video tutorial, you’ll have your blanket done in no time! Stroller-sized newborn blanket with instructions to make in any size. Using I Love this Cotton yarn from Hobby Lobby.